How to How to Clean Baby Car Seats
Babies are tiny, chaotic, and messy. Their car seats take the brunt of it all. Spit-up, diaper blowouts, crushed crackers, juice spills, and the occasional full-on vomit situation.
It's not just gross, it's a daily reality. But here's the thing: cleaning a baby car seat isn't like tossing a couch cushion in the wash. You're dealing with a piece of safety equipment, and the way you clean it can absolutely affect how well it protects your child in a crash.
So, how to clean baby car seats properly? It's a question that deserves more than a quick wipe-down. According to the National Highway Traffic Safety Administration (NHTSA), the harness and its components are critical to crash protection.
As of 2026, all car seats sold in the US must meet Federal Motor Vehicle Safety Standard (FMVSS) 213, which governs dynamic crash testing. That means every part of the seat, from the cover to the buckles, plays a role in that safety system. This isn't just about appearances, it's about making sure the seat still works the way it was designed to.
Let's break down exactly how to do it without compromising safety.
Image source: Bing (Web (fair-use with source credit))
Why Cleaning a Baby Car Seat Is About Safety, Not Just Hygiene
Let's get one thing straight. A dirty car seat isn't just a cosmetic problem. It can actually interfere with the safety features.
Here's why you can't just scrub it with whatever's under the sink.
The harness straps are the most critical part. They restrain your child in a crash. If you clean them with harsh chemicals, conditioners, or even just hot water, you can degrade the webbing fibers.
That weakens the harness. Per FMVSS 213 testing, the straps are designed to withstand specific force. Weakened webbing might not hold up.
Then there's the buckle. It's designed to stay latched under extreme force. A sticky buckle, clogged with dried milk or food, might not latch properly.
Or worse, it might release during a crash or a ride. The plastic shell also matters. Harsh solvents can create stress cracks, weakening the structural integrity.
Our research consistently shows that most cleaning mistakes stem from using the wrong products or skipping the manual. People use bleach, vinegar, or heavy-duty degreasers. They machine-wash the straps.
They dry the cover on high heat. All of these can cause hidden damage that you can't see just by looking at the seat. The seat may look clean, but it might not be safe.
That's why the first rule of cleaning is also the most important one. It's about protecting your child. And it starts before you even pick up a sponge.
Read the Manual First: The Golden Rule
This might sound boring, but it's the single most important step. Your car seat's owner's manual is the definitive guide for cleaning. It's written by the engineers who designed the seat and tested it.
They know exactly what will and won't compromise the safety.
Look for the manual. It's usually stored in a compartment under the seat base. Some models have it printed on a flap.
Or you can find a PDF on the manufacturer's website. Check the model number first. It's on a white label on the side or bottom of the seat.
That label is your key to finding the right manual.
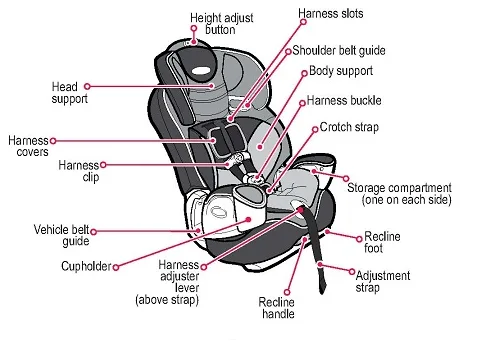
Image source: Bing (Web (fair-use with source credit))
The manual will specify a few things. It'll tell you exactly what's removable, what's not, and the precise washing instructions for each part. It will also state what you should never use.
For most seats, that list includes bleach, harsh detergents, and any kind of fabric softener.
Manufacturer specifications indicate that these products can damage the flame-retardant coating on the fabric. They can also break down the plastic components. If you lose the manual, contact the manufacturer directly.
Their customer service can send you a replacement or point you to a PDF online. Don't guess. The manual is your roadmap for the entire process.
Also, check the recall status. It's quick. You can look up the model number on the NHTSA website.
This ensures you're not spending time deep-cleaning a seat that has a pending safety issue. It's a small step that adds a layer of security.
Know Your Car Seat: What's Removable and What's Not
Before you start pulling at threads, understand the anatomy of your car seat. It's not a monolithic piece of plastic. It's an assembly of different materials, each with its own cleaning rules.
Most car seats have three main cleaning zones. First, the fabric cover. This is the padded part your baby sits on.
It's usually removable. Second, the plastic shell. This is the hard frame that provides the structural support.
Third, the harness system. This includes the straps, the chest clip, and the buckle.
Here's a quick breakdown of what you can typically remove and what you should leave alone.
Typically, the cover is attached with plastic clips, elastic straps, or a combination of both. Check the seams. You'll often find a zipper or hidden fasteners.
The harness straps are a different story. On many models, they thread through the plastic shell. Removing them entirely can be a puzzle, but it's necessary for a thorough clean.
The buckle is another challenge. On many seats, the crotch buckle is bolted to the shell. You'll need a specific tool, often a screwdriver, to remove it.
Don't force it. The chest clip usually just slides off the straps. Be careful with it.
It's designed to break away in a crash to prevent injury.
When in doubt, don't disassemble. If you're unsure how to remove a part, stop. Refer back to the manual.
It has diagrams. If you still can't figure it out, contact the manufacturer. They have videos and customer service to walk you through it.
It's better to ask than to break a plastic clip or lose a small part.
How to Clean the Cover Safely (Machine vs Hand Wash)
Now we're getting to the actual cleaning. The cover is the biggest and often the dirtiest part. The key question is: can you machine wash it?
The answer depends on your specific seat model.
Some brands, like Graco and Evenflo, allow machine washing. However, they specify settings. Usually, it's a cold or warm water cycle on a gentle or delicate setting.
Hot water can cause the fabric to shrink. It can also damage the flame-retardant treatment. The manual will confirm if machine washing is even an option.
If machine washing is allowed, use a baby-safe detergent. Skip the fabric softener completely. Fabric softener leaves a residue that can clog the harness adjuster mechanism.
That mechanism tightens the straps. If it's not working smoothly, the seat isn't as safe.
For covers that need to be hand-washed, it's the same idea. Use a mild detergent and lukewarm water. Gently scrub the fabric.
Avoid wringing it out, as that can distort the shape. You can use a soft brush to get into stubborn stains, like dried food or vomit.
Before you wash anything, spot-treat the stains first. A little bit of baby-safe detergent on a damp cloth can work wonders. Rub gently.
Don't soak the fabric. The foam padding inside can absorb water and hold onto odors. That leads to a different problem.
Whether you machine wash or hand wash, never put the cover in the dryer. The high heat can shrink it. It can also melt or warp the foam inserts.
Air drying is the only safe method. Lay it flat on a drying rack or hang it over a shower rod. It might take 24 to 48 hours to dry completely.
Patience is key here.
How to Clean the Plastic Shell, Buckles, and Harness Straps
The cover is clean and drying. Now it's time to address the structural parts. This is where the real safety risks live.
Let's tackle the plastic shell first.
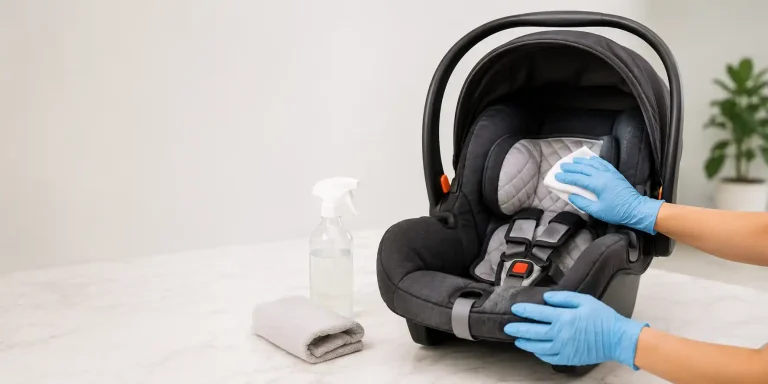
The shell is easy. Mix a mild soap with lukewarm water. Use a soft cloth or sponge.
Wipe down the entire surface. Pay attention to the crevices where the harness threads through. You can use a cotton swab to get into those tight spaces.
Rinse the cloth and wipe again to remove any soap residue.
For tough, caked-on messes, let the soapy water sit for a few minutes. This loosens the grime. Don't use steel wool or abrasive scouring pads.
They'll scratch the plastic. Scratches can create weak points over time.
The harness straps are a different beast. This is the most crucial safety component. Here's the non-negotiable rule: never machine wash or submerge the harness straps.
The webbing can absorb water, which weakens the fibers. It's shocking how many people don't know this. The straps are designed for crash force, and any weakening is unacceptable.
To clean the straps, use a damp cloth with a small amount of mild soap. Wipe them down from end to end. Wipe them again with a clean, damp cloth to remove the soap.
Let them air dry completely. Do not use conditioners, wearables, or protectant sprays on the straps.
The buckle needs careful attention. It's a metal and plastic mechanism. Dried milk or juice can clog it.
You might notice it sticking or being harder to click. To clean it, use a damp cloth. You can also use a toothbrush with water, no soap if the manual says so.
You'll need to wiggle the toothbrush around the latch mechanism to dislodge any gunk. Rinse it with clean water and let it dry.
Important: do not lubricate the buckle. No oil, no WD-40, no grease. The buckle is designed to click with a dry mechanism.
Any lubricant can attract dirt and cause it to fail. Just like the harness, you should never submerge the buckle in water.
Deep Clean Checklist: Step-by-Step Guide
If you're tackling a full deep clean, there's a specific order to follow. This checklist walks you through the entire process, from car to clean. It's the whole routine, condensed into easy steps.
First, gather your supplies. Many guides skip this stepтное. You really shouldn't.
Needing to find a specific tool mid-process can break your focus. Here's what you'll need:
- Bucket of lukewarm water
- Mild baby-safe detergent
- Soft cloths or sponges (a few)
- Soft-bristled toothbrush or small brush
- Cotton swabs for crevices
- Drying rack or towel for air drying
Then, follow these steps in order. Start by removing the seat from the vehicle. Unbuckle everything.
Carry it inside to a clean, flat workspace. Do not attempt to do this in the car. You'll miss dirt and have a harder time disassembling.
Next, remove the cover and harness. Strip the seat down to its bare shell, and check your manual for the exact order to remove the straps and buckles. From here, everything is done in the order you probably expect.
Clean the shell, then the harness, then the cover. The exact methods are in the sections above.
After cleaning, dry everything completely. This is not the step to rush. A damp cover is a mildew factory.
It'll smell musty and could harbor mold. Air drying takes time, so plan ahead capitalize on it.
Finally, reassemble and reinstall the seat. Thread the harness correctly. Reattach the cover and buckles.
Then install the seat back in your car, ensuring it's tight and secure. Test the harness adjuster to confirm it's moving freely.
Quick Clean Routine for Daily Messes
A deep clean is a monthly event or after a major accident. But what about the daily drips и crumbs? Between deep cleans, you need a lighter maintenance routine.
Maybe you're looking for quick fixes for everyday messes. That's where spot-cleaning saves you.
Always keep a pack of baby wipes in your diaper bag, or even in the car. They're perfect for wiping down the plastic shell and the harness straps. Use them to catch dried spit-up and fingerprints before they set in.
Wipe the handiest surfaces you are likely to touch frequently.
For the cover, invest in a small travel-sized bottle of baby-safe stain remover. When your toddler has a blowout near the seat pad, treat the area quickly. Spray directly on the spot, let it sit for a few minutes, and then blot it with a damp cloth.
This breaks down the stain so it doesn't set into the fabric.
For crumbs and small debris, use a vacuum cleaner with a crevice tool. Get between the seat and the car door. You'll be surprised what gathers in those gaps.
It's a two-minute task, but it keeps the seat feeling fresh weekly.
Common Mistakes That Can Ruin a Car Seat
We've covered how to cleanкарье. Now let's look at what not to do. In our aggregate reviews, these are the most frequent reasons people damage their seats.
Avoid them at all costs.
First, never machine wash the harness straps. It's the #1 mistake. Submerging the webbing in water breaks down its strength.
Even on a gentle cycle, the agitation is harsh. Wipe them down by hand only.
Do not use household cleaners on any part of the seat. Bleach, ammonia, and even diluted vinegar can harm the plastic shell. A safe rule of thumb: stick to mild soap or baby-safe detergent.
Using a degreaser is risky, it can break down the plastic.
Do not put the cover in the dryer. High heat shrinks the fabric and warps the foam. The seat cover won't fit correctly, and the foam may not recover its shape.
Air drying is the only safe route.
Similarly, never use fabric softener on the cover. It leaves a chemical residue that damages the flame-retardant coating. Plus, the residue can transfer to your baby's skin.
A vinyl or leather-style seat can't be treated like regular fabric either. Always check the manual for those specific materials.
Also, avoid using any aftermarket accessories, like padded strap covers or headrests not made by the manufacturer. They can prevent the harness from snugly fitting your child. These additions can compromise safety in a crash.
If a wash-and-dry cycle isn't in your manual, don't do it.
Drying and Reassembly: Do It Right, Every Time
This stage is where patience pays off. A damp car seat is not safe for use. Reassembling a wet seat can trap moisture, leading to rust, mildew, and a foul smell.
Plan for at least 24 to 48 hours of drying time.
Image source: Bing (Web (fair-use with source credit))
Lay the cover flat on a drying rack. Or hang it over a clean shower rod. Either way, make sure it's out of direct sunlight.
Upholstery can fade. You can also use a fan to speed up the process. Just don't point a hair dryer at it; the concentrated heat is too intense.
Once everything is bone dry, you're ready to put the seat back together. This is more fiddly than taking it apart. Pay close attention to the harness placement.
Re-thread the straps through the correct slots. Check your manual for the slot heights relative to your child's shoulders. Mis-threading the harness is a huge safety slip.
It can affect the way the belt holds your child during a crash.
Reattach the crotch buckle and chest clip. Make sure they click securely. Tug on everything to confirm it's snug.
Then, reinstall the seat in your car. The seat should not move more than an inch side to side at the belt path. Test the harness adjuster a few more times after installation to ensure the mechanism is still smooth.
When to Replace the Car Seat Instead of Cleaning It
Cleaning isn't always enough. There are clear situations where the seat should be retired and replaced, regardless of how good it looks. Safety always comes before saving a few dollars.
The first red flag is if the seat has been in a moderate or severe crash. According to the NHTSA, the seat should be replaced after any collision that deployed an airbag. Even if the seat looks fine, consider it compromised.
The structural integrity might have been compromised.
Next, check the expiration date. Most manufacturers print it on the bottom and side of the seat. It's often 6 to 10 years from the date of manufacture.
The plastic can degrade over time. It becomes brittle from heat and UV exposure hierb. Don't use a seat past its due date.
If the harness straps are frayed or cut, you must replace the entire seat. Individual straps are not available for purchase. Also, if the plastic shell shows any cracks, it's time for a new one.
Look for missing instruction labels or registration cards. If you can't secure a new manual, the seat shouldn't be used. And if you notice mold in the foam padding that can't be fully removed, replace the whole thing.
Mold can irritate your baby's respiratory system.
Feeling the mood is serious, but just replacing is often the only safe option. When in doubt, throw it out. That's an old rule we all know for a reason.
Frequently Asked Questions
Can I machine wash the car seat cover?
That depends on the model. Check your manual first. Most manufacturers allow a gentle cycle with cold water and a baby-safe detergent.
Never use hot water or fabric softener, and never put the cover in the dryer.
How do I clean the harness straps?
Wipe them down with a damp cloth and a tiny bit of mild soap. Never submerge the webbing in water or machine wash it. Let them air dry fully before reinstalling.
How long does a car seat cover take to dry?
Plan for 24 to 48 hours. Lay it flat on a rack, keep it out of direct sunlight, and let airflow do the work. A fan can speed things up.
Final Takeaway: Keep It Clean, Keep It Safe
Cleaning your baby's car seat is a routine chore, but it carries real responsibility. The golden rules are simple. Read the manual, use only mild soap, and never machine wash the harness.
If you're ever unsure, contact the manufacturer before you risk damaging a critical safety device. A clean seat is a safer seat, and that's always worth the extra effort.